7 Best Knee Strengthening Exercises for Seniors at Home: My Journey to Moving Pain-Free Again
If you are looking for effective knee strengthening exercises for seniors at home, you aren’t alone. Many of us face joint stiffness as we age, but the right movements can make all the difference. In my journey, I discovered that performing knee strengthening exercises for seniors at home is the most sustainable way to stay active without expensive gym gear.
It’s frustrating, isn’t it? That feeling like your own body is putting up “No Entry” signs on activities you used to love—like gardening, walking the dog, or even just doing the grocery shopping.
For a long time, I thought this was just “part of getting older.” I figured I’d just have to live with the stiffness. But after talking to some experts and doing a lot of reading for weightsfits.com, I learned something life-changing: We don’t just have to take it. We can strengthen our way out of it.
In this guide, I want to share the exact routine that helped me find my footing again. No fancy gym memberships, no heavy weights, and definitely no scary surgery talks. Just you, a sturdy chair, and a little bit of time.
Why Our Knees Start to “Whine” (And Why Rest Isn’t Always the Answer)
When my knee pain first started, my instinct was to move less. I thought, “If it hurts to walk, I should probably stay on the couch.” Actually, that’s one of the biggest mistakes we make. When we stop moving, the muscles around the knee—especially the quadriceps (thighs) and hamstrings—start to weaken. Think of these muscles like a protective shock-absorber system for your joints. If the shocks are broken, every step vibrates right into the bone.
By doing these simple exercises at home, we aren’t just “working out.” We are building a natural brace for our knees.
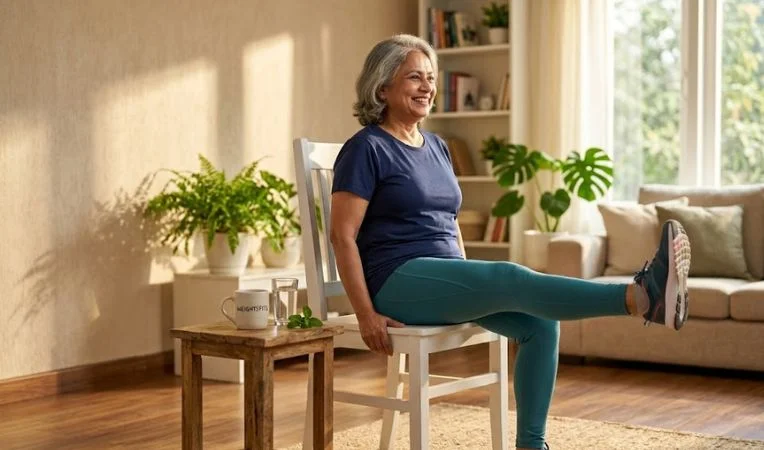
1. The “Wake-Up” Leg Extension
I call this the wake-up call because it’s the easiest way to tell your thigh muscles it’s time to work. I usually do these while I’m waiting for my morning coffee to brew.
My Experience: At first, I couldn’t even keep my leg straight for more than a second. My thigh would shake like a leaf. But after a week? The shake was gone.
How to do it:
- Find a sturdy chair (no wheels!). Sit up straight like you’re proud of something.
- Slowly lift your right foot until your leg is straight out in front of you.
- Flex your toes back toward your face. Feel that tightness in your thigh? That’s progress.
- Hold for 3 seconds, then slowly lower it.
- Do this 10 times on each side.
2. The Sit-to-Stand (The King of All Exercises)
If you only have time for one exercise, make it this one. It’s basically a squat, but we call it “Sit-to-Stand” because it’s a movement we do every single day.
My Experience: I used to have to “heave” myself up using the armrests. My goal was to stand up using only my leg power. It took about three weeks of daily practice, but the day I stood up hands-free, I felt like I’d won an Olympic gold medal.
How to do it:
- Sit on the edge of your chair with your feet flat on the floor, shoulder-width apart.
- Cross your arms over your chest (this stops you from cheating and using your hands!).
- Lean slightly forward and push through your heels to stand up straight.
- Slowly, and I mean slowly, lower yourself back down until your bottom just touches the seat.
- Do 10 of these.

3. The “Wall Slide” (My Secret Weapon)
This one is great because the wall provides all the support you need. It builds serious strength in your quads and glutes without the fear of falling.
How to do it:
- Lean your back against a smooth wall. Walk your feet out about 12 inches in front of you.
- Slowly slide your back down the wall until your knees are slightly bent. Don’t go too low—this isn’t a deep squat!
- Hold it there for 5 to 10 seconds. You’ll feel a “burn,” but the good kind.
- Slide back up.
- Repeat 5 times.
4. Standing Calf Raises
We often forget about the muscles below the knee, but your calves are like the foundation of a house. If they are strong, your knees don’t have to wobble as much.
How to do it:
- Stand behind your chair and hold onto the back for balance.
- Slowly rise up onto the balls of your feet, as if you’re trying to look over a tall fence.
- Hold for a second at the top, then slowly lower your heels back down.
- I like to do 15 of these while I’m brushing my teeth!
5. Straight Leg Raises (The Bedtime Routine)
I found that doing these while lying in bed in the morning or before sleep was a great way to stay consistent.
How to do it:
- Lie flat on your back. Bend one knee and keep that foot flat on the bed.
- Keep the other leg perfectly straight and lift it up to the height of your other knee.
- Keep your lower back pressed into the mattress.
- Lower it slowly.
- Aim for 10 reps on each leg.
6. The Side-Lying Leg Lift
This one targets the hips. You might think, “Why work the hips for knee pain?” Think of your hips as the steering wheel for your legs. If your hip muscles are weak, your knees start to wobble out of alignment, which is where that nagging pain usually begins. If your hips are weak, your knees “cave in,” which causes a lot of pain.
How to do it:
- Lie on your side with your legs stacked on top of each other.
- Lift your top leg up toward the ceiling—keep it straight!
- You don’t need to lift it very high; about 12 inches is plenty.
- Lower it back down.
- Do 10 reps, then flip over and do the other side.
7. Heel Cord Stretches
Strength is great, but flexibility is the other half of the coin. If your calves are too tight, they “pull” on your knee joints all day.
How to do it:
- Stand facing a wall and put your hands on it for support.
- Step one foot back and keep that heel flat on the floor.
- Lean forward into the wall until you feel a nice, deep stretch in the back of your lower leg.
- Hold for 30 seconds. This shouldn’t hurt; it should feel like a “release.”
- Switch legs.
A Few Things I Wish Someone Had Told Me Earlier
When I first joined the weightsfits.com community, I’ll admit—I wanted results yesterday. I was tired of waiting and just wanted to feel ‘normal’ again, but I soon realized that true healing is a marathon, not a sprint. I wanted the pain to vanish in 24 hours. Here is the reality of being a senior and staying fit:

Listen to the “Good” vs “Bad” Pain
There is a difference between “muscle work” and “joint pain.” If your muscles feel tired or a bit sore, that’s great—they are growing! But if you feel a sharp, stabbing, or hot pain inside the knee joint, stop. Take a break. Sometimes, your body speaks to you in whispers of soreness. If it’s telling you to pump the brakes and rest today, listen to it. Taking a breather is just as important for your knees as the workout itself.
The Power of 10 Minutes
You don’t need an hour-long workout. I found that 10 minutes in the morning and maybe 5 minutes in the evening was much more effective than doing one huge workout on Sunday and then being too sore to move on Monday.
Hydration and Nutrition
I noticed my joints felt “clunky” when I didn’t drink enough water. Think of water as the oil for your hinges. Also, adding a little extra protein to my meals helped my muscles recover much faster after these exercises.
Fueling Your Progress: What I Eat for Stronger Knees
Doing the exercises is only half the battle. I quickly realized that if I wanted my muscles to repair themselves and my joints to feel “oiled,” I had to look at what I was putting on my plate. In my experience, a “pro-inflammatory” diet—lots of sugar and processed flours—made my knee stiffness much worse. When I switched to more whole foods, the change was almost immediate.
I started focusing on Anti-inflammatory foods. Think of things like fatty fish (salmon is my favorite), walnuts, and plenty of leafy greens. These foods are packed with Omega-3s, which act like a natural, gentle ibuprofen for your joints. Also, don’t underestimate the power of Vitamin C from oranges or bell peppers; it’s essential for collagen production, and collagen is the “glue” that holds your knee cartilage together.
The Supplement Talk: What Worked for Me
Now, let’s talk about the supplement aisle. It can be overwhelming, right? When I first looked, I saw hundreds of bottles promising “miracle cures.” After a lot of trial and error (and consulting with my doc), I found a few that actually made a difference for my aging knees. Glucosamine and Chondroitin are the big players here—they help maintain the cushion in your joints.
I also added a Vitamin D3 and Calcium supplement because, as seniors, our bone density is everything. If the bones around the knee are strong, the joint is much more stable. Another game-changer for me was Turmeric (Curcumin). It’s a natural anti-inflammatory that helped me get through those extra stiff mornings. However, a quick word of advice: always chat with your doctor before adding these to your routine, especially if you’re already taking other medications.
❓ Frequently Asked Questions (FAQ)
In my experience, you’ll feel a bit more “stable” within 2 weeks. For a significant reduction in pain, stay consistent for at least 4 to 6 weeks.
I suggest doing the strengthening moves 3-4 times a week to give your muscles a day to rest. However, gentle stretching can (and should!) be done every day.
If it’s just a noise and doesn’t hurt, it’s usually just air bubbles or tendons moving—totally normal! But if the “pop” comes with sharp pain, stop and see a doctor.
Yes, but only after your physical therapist gives you the green light. These moves are great for post-surgery recovery once you are cleared.
If your knees feel “hot” or swollen, use ice for 15 minutes. If they just feel stiff and tight, a warm towel or heating pad can help relax the muscles.
Closing Thoughts From a Friend
If you’re reading this and feeling skeptical, I get it. I’ve been there—sitting in that armchair, wondering if I’d ever walk comfortably again.
But here is the truth: Your body is incredibly resilient, even in our golden years. It wants to move. It wants to be strong.
Start with just one of these exercises today. Just one. Maybe the seated leg extensions while you’re watching the news. Once that feels easy, add another. Before you know it, you’ll be the one telling your friends, “Actually, my knees feel better than they did five years ago.”
I’m rooting for you. Let’s keep moving together!
For more tips on staying active and healthy as we age, keep an eye on weightsfits.com. We’re all in this journey together.
About the Author
Hi, I’m Mst Shahnaj Begum! As a fitness enthusiast and a long-time contributor to weightsfits.com, I specialize in making health and wellness accessible for everyone, regardless of age. My journey into senior fitness began when I saw my own loved ones struggle with mobility. Since then, I’ve dedicated myself to researching and sharing simple, effective, and science-backed routines that anyone can do at home.
When I’m not writing or testing out new low-impact workouts, you can find me hiking local trails or enjoying a good book with a hot cup of green tea. My mission is to help you stay strong, stay mobile, and live your best life—one movement at a time.